[ AddinBox Home (Japanese) ] [ English Home ]
Breakthrough in
the Pseudo-Control-Array
(Jpn. 1st Edition : 17 May 2004 )
(Jpn. Last Edition : 11 Oct. 2016 )
(Eng. 1st Translation: 24 Jul. 2014 )
(Eng. Last Translation: 1 Sep. 2020 )
This document is translated from the document which I released in
Japanese in 2004 about the event handling of the Pseudo-Control-Array
of Excel-VBA.
[ http://addinbox.sakura.ne.jp/Breakthrough_P-Ctrl_Arrays.htm ( Jpn. )]
[ Old Site : http://www.h3.dion.ne.jp/~sakatsu/ ]
It begins with the Basics & the Problems of Pseudo-Control-Array and
explains the Problems & the Solution in a process reaching the technique
of the event handling at the same level as VisualBasic .
Everybody seems to call it "Control-Array" about VBA as far as I read the
forum of the English zone. In Japan, we often call it "Pseudo-Control-Array".
( It is not a function implemented as a system like VB. In a meaning of the
alternative technique and not to be true Control-Array, we touch "Pseudo-"
and call it with "Pseudo-Control-Array". )
So, in a meaning to leave the limitation of VBA and to realize the event
handling at the same level as VB, the title of the document of Japanese
becomes "Breakthrough in Pseudo". The opening sentence of the Japanese
document begins in this way.
What is Pseudo?
It is Pseudo-Control-Array.
Then what is Pseudo-Control-Array?
O.K. then, let's begin with the explanation of Pseudo-Control-Array. ....
---- Contents of Breakthrough in the Pseudo-Control-Array (Jpn.) ----
Chap. 1: VB(Visual Basic) vs VBA(Visual Basic for Application)
Chap. 2: Use of the Controls collection
Chap. 3: Use of the Collection object
Chap. 4: What is the Class module?
Chap. 5: Use of the Class module
Chap. 6: Problems to remain with the Pseudo-Control-Array
Chap. 7: Operate the objects and the properties etc. in the UserForm module
from the Class module
Chap. 8: At first we take a step forward from the Pseudo-Control-Array
Chap. 9: Problems of the Pseudo-Control-Array becoming a hindrance
Chap. 10: Breakthrough in the Pseudo-Control-Array
Chap. 11: Sample macro
The volume of all the Japanese documents is about 5 times of this page.
This document translated Chap. 10 and Chap. 11 into English mainly.
The flow of following conversation is the contents from Chap. 1 to Chap. 9.
Furthermore ....
the class module of VBA cannot implement Enter and Exit events, but it
is enabled by API (ConnectToConnectionPoint).
( Because I who am poor at English am translating into English while using translation software,
there may be an odd expression. The mistranslation revises it sequentially. )
---- Contents ( History of clsBpca ) ----
1. Question about the event handling of plural controls
2. Key point of Breakthrough in the Pseudo-Control-Array (Bpca)
3. Flow of the event handling of Bpca
4. Sample (Click event of CommandButton)
- - - - - - - - - - - - - - - - - - - - - - - - - - - - - - - - - - - - - - - - - - - - -
5. General-purpose class module (clsBpca Ver 4.0) and use example
5-1. Using Exit event, if it is not a numeric, warning indication (TextBox)
& Using Enter / Exit event, ActiveControl indication
( The use of the Enter / Exit event is possible since clsBpca (Ver2.0) ).
5-2. Using Change event, highlight the color of the button (OptionButton)
5-3. Using Change event, if it is not a numeric, warning indication (TextBox)
5-4. Using KeyDown event, if it is not an alphanumeric character, warning indication (TextBox)
5-5. Using Click event, Calculator
5-6. Using MouseMove & Click event, Color palette form
5-7. Using MouseMove & Click event, Calendar form
5-8. Use example to the dynamic creation control
5-9. Use example to controls on a worksheet
- - - - - - - - - - - - - - - - - - - - - - - - - - - - - - - - - - - - - - - - - - - - -
6. Implementation of the event handling by API (ConnectToConnectionPoint)
The class module of VBA cannot implement Enter and Exit events,
but it is enabled by API ( ConnectToConnectionPoint ).
- - - - - - - - - - - - - - - - - - - - - - - - - - - - - - - - - - - - - - - - - - - - -
7. ToggleLabel-Button class ( clsBpcaTglLbl Ver 4.1 )
Flag type button only with good points of Toggle, Option and CheckBox. Figure
- - - - - - - - - - - - - - - - - - - - - - - - - - - - - - - - - - - - - - - - - - - - -
8. Focus class ( clsBpcaFocus Ver 1.5 )
The class which detects focus movement (change of ActiveControl) without using Enter/Exit event.
[ Link to here ]
---- The question about the event handling of plural controls. ----
I will express the contents of Chap. 1 to Chap. 9 by a simple conversation.
[ Y ] : You ( you who read this )
[ K ] : K.Tsunoda ( it's me )
Y : How does the event handling do it in Control-Array in VBA ?
K : In the first place, the Control-Array function same as VB is not implemented in VBA.
Therefore, the event handling such as VB is not usable in VBA, too.
Y : Is there the alternative technique for Control-Array of VB in VBA ?
K : You can operate plural controls as follows using Controls-Collection-Object.
Me.Controls ( "TextBox" & Idx ) .Value = "1234"
And, you can define the event of plural controls by one event procedure using a class module.
In this case, all the processing to perform by an event will define it in a class module.
( Pseudo-Control-Array )
Y : Then can we not describe an event handling on UserForm module?
Is there the alternative technique for an event handling on UserForm?
K : You can define the Custom Event by using "Event declaration" and "RaiseEvent method"
in the Class module.
The class module takes charge of only the detection of the event of the control. When the
class module detects an event, the class module fires a custom event to UserForm. So you
become able to describe an event handling in custom event procedure in UserForm.
Y : When is it that "RaiseEvent method" was implemented ?
K : It is implemented in Excel2000. The release of Excel2000 is June, 1999.
Y : From such past ? Because this year is 2014, 15 years ago!
Why does everybody not use it? Will we be usable ?
K : Yes, you are usable it from past.
Y : Then can we handle the custom event of Control-Array, if we use the class module ?
K : No, you cannot do it.
Y : Why ? You said that we could define the custom event using the class module !
K : Yes, you can define the custom event. But you cannot do it in Array.
Y : What do you mean ?
K : There is not any problem with defining the class object as an Array.
Of course there is not any problem with "Event declaration" and "RaiseEvent method" in
the class module either.
Y : Though nothing has any problem, why can we not do it ?
K : It does not have any problem to fire the custom event (Class module).
However, the side to receive of the custom event has a problem (UserForm module).
Y : What do you mean ?
K : The definition of the object variable with "WithEvents" is necessary to receive an event.
Y : Yes, I know it.
K : Because it is a story of Control-Array, does the object variable define it in Array ?
Y : Yes, it is so.
K : A definition of Array cannot describe "WithEvents" keyword.
-- Help : WithEvents --
You can declare as many individual variables as you like using WithEvents,
but you can't create arrays with WithEvents.
Y : Oh my God !
K : Do you understand it ?
Y : I can't help it, I give it up.
K : Do you give it up ?
I released the document (Breakthrough in the Pseudo-Control Array : Japanese) in 2004.
Thereafter, the technique to realize Control-Array including an Event Handling is becoming
popular in Japan since 2004. ( History by Internet Archive's Wayback Machine. -- Capture -- ).
[ History of clsBpca ]
Y : Is there it ? What kind of technique is it ?
K : Then let's begin explanation from now on.
[ Link to here ]
--- Key point of Breakthrough in the Pseudo-Control-Array ( Bpca ) ---
In VBA (Excel2000 and later), RaiseEvent method to fire a custom event is usable.
You can receive a custom event fired by RaiseEvent method by a class object variable
with "WithEvents".
Accordingly, Control-Array seems to be able to be realized, if you define the object of the
custom event class in an array variable.
However, it is impossible.
The reason why Control-Array is impossible in VBA is not to be able to describe
"WithEvents keyword" by array declaration.
-- Help : WithEvents --
You can declare as many individual variables as you like using WithEvents,
but you can't create arrays with WithEvents.
This document explains on a technique to realize Control-Array in VBA avoiding the
limit mentioned above.
At first I will list problems becoming a hindrance.
a) In the Class firing a custom event, , the Definition of "Event statement" and the
Practice of "RaiseEvent statement" does not have any problem at all.
b) Because "WithEvents" keyword is not described to the Array declaration of the
class object in UserForm receiving the custom event, a custom event is not usable.
Conversely, if a class object definition does not have the array declaration on the
UserForm side, there is no problem.
But in this situation it contradicts it because it does not become the Control-Array
if you do not declare it as an array.
The key point of "Breakthrough in the Pseudo-Control-Array" is to divide the function
of the class into Fire-Events and Make-Array.
[ Link to here ]
--- Flow of the event handling of Bpca ---
Because I prepare for an illustration, please understand the following explanation
while watching an illustration together. ( Illustration of clsBpca Concept )
1. Applies the Class module by 2 steps ( clsBpca and clsBpcaCh ).
- - - - - - - - - - - - - - - - - - - - - - - - - - - - - - - - - - - - - - - - - - - - - - - - - - - - -
2. 1st-Step class module "clsBpca" ( Parent class, It is only one. )
2-1. It is the class to use for a definition of the control array in UserForm.
But the variable to declare in this class does not define it with Array.
Because it is not array, you can describe "WithEvents" keyword.
In other words, you can receive a custom event from the class of this variable.
2-2. The controls to make array on UserForm enroll in the collection in the 1st-Step
class. ("Add" method of clsBpca)
2-3. According to the number of controls registered with the collection, you create
the 2nd-Step class object as the Dynamic Array in the 1st-Step class.
2-4. You assign a control in the collection to an element of this array of the class
object one by one.
- - - - - - - - - - - - - - - - - - - - - - - - - - - - - - - - - - - - - - - - - - - - - - - - - - - - -
3. 2nd-Step class module "clsBpcaCh" ( Child class; It is one per one control object. )
3-1. This class object is created as a Dynamic array in the 1st-Step class.
3-2. In the 2nd-Step class object (individual elements of the dynamic array), one control
is assigned to each.
3-3. The variable that control is assigned to here is not array.
(The 2nd-Step class object is array, but the control variable in the individual array
element is not array.)
3-4. Because a control variable is not array, the variable can describe "WithEvents".
3-5. In this way, in individual elements of the array of the 2nd-Step class, you can
receive an event of the control in UserForm.
- - - - - - - - - - - - - - - - - - - - - - - - - - - - - - - - - - - - - - - - - - - - - - - - - - - - -
4. Fire Custom Event ( Flow of the event handling )
4-1. An event of the control on UserForm fire by Macro-processing or the Operation
of the person.
4-2. You can receive an event of the control by a variable with "WithEvents" of the
individual elements of the 2nd-Step class.
4-3. For the notice of the event to the 1st-Step class, you call the method of the 1st-Step
class from the 2nd-Step class. (In the individual elements of the 2nd-Step class, you
keep the reference of the 1st-Step class object as the parent object.)
4-4. You carry out "RaiseEvent" in the method of the 1st-Step class and fire the custom
event.
4-5. By a class obect variable (clsBpca) with "WithEvents" in UserForm, you receive the
custom event of the 1st-Step class.
Then, with the click event of the CommandButton as an example, I will make a class
module by this technique.
[ Link to here ]
--- Sample (Click event of CommandButton) ---
The sample macro which does "the indication of the weekday name" and "the change
of the button color" by the click of the weekday button (Sunday to Saturday).
I put off the presentation of the macro code of the class module.
At first, please watch the macro code of the UserForm module which is the use side.
===== UserForm module =========================
Private WithEvents WeekBtn As clsBpcaCmd
Private Sub UserForm_Initialize()
Set WeekBtn = New clsBpcaCmd ' Create Instance
With WeekBtn
.Add cmdSun ' Register control in a class
.Add cmdMon
.Add cmdTue
.Add cmdWed
.Add cmdThu
.Add cmdFri
.Add cmdSat
.Rgst ' Create Child-class(clsBpcaCmdCh)
End With
End Sub
Private Sub UserForm_Terminate()
WeekBtn.Clear ' Clean up and Release
Set WeekBtn = Nothing
End Sub
Private Sub WeekBtn_Click(ByVal Index As Integer)
Dim vntWeekName As Variant
Dim i As Integer
vntWeekName = Array("", "Sun", "Mon", "Tue", _
"Wed", "Thu", "Fri", "Sat")
If (WeekBtn.Item(Index).BackColor = vbButtonFace) Then
For i = 1 To 7
If (i = Index) Then
WeekBtn.Item(i).BackColor = &HCCFFFF 'Light Yellow
Else
WeekBtn.Item(i).BackColor = vbButtonFace
End If
Next i
Else
WeekBtn.Item(Index).BackColor = vbButtonFace
End If
MsgBox "[" & vntWeekName(Index) & _
"] button is clicked (" & Index & ")"
End Sub
It become the event coding at the same level as VB.
It is only the difference that Item property is sandwiched in between.
VB : cmdWeek(Index).BackColor
Bpca : WeekBtn.Item(Index).BackColor
In addition, if you define the Item property as "Default Property" in a class module,
you can omit a description of "Item". Then, it is the completely same as VB.
In the general-purpose class module (clsBpca), I define the Item property as
"Default Property".
---- You can do it with the style that omitted "Item" (default property) as follows. ----
If (WeekBtn(Index).BackColor = vbButtonFace) Then
For i = 1 To 7
If (i = Index) Then
WeekBtn(i).BackColor = &HCCFFFF 'Light Yellow
Else
WeekBtn(i).BackColor = vbButtonFace
End If
Next i
Else
WeekBtn(Index).BackColor = vbButtonFace
End If
---- Method to define "Default Property" ----
You add the following the red-bold-faced part on the export file of the class module
and take in a module by import again.
( The red-bold-faced part is invisible on the code window. )
[ Export file : clsBpcaCmd.cls ]
'---( Item property )---------------------------------------------
Public Property Get Item(ByVal Index As Integer) As MSForms.CommandButton
Attribute Item.VB_UserMemId = 0
If ( blnRgst = True ) And _
(Index > 0) And ( Index <= colCtrl.Count ) Then
Then we will watch the macro code of the class module.
Please watch while comparing it with a Illustration.
==== clsBpcaCmd module(1st-step class module) ====
'------[ Event definition (Raise to the User-side) ]--------------
Public Event Click (ByVal Index As Integer)
'------[ Control-Array definition ]--------------------------
'Child-class of clsBpcaCmd (Dynamic array)
Private clsCtrlCh() As clsBpcaCmdCh
'The storage of the controls on UserForm
Private colCtrl As Collection
'Rgst method practice Flag : Done(True) , Not(False)
Private blnRgst As Boolean
Private Sub Class_Initialize()
Set colCtrl = New Collection ' Create Instance
End Sub
Private Sub Class_Terminate()
If (blnRgst = True) Or (Not (colCtrl Is Nothing)) Then
Me.Clear
End If
End Sub
'---( Add method )------------------------------------
Public Sub Add(ByVal NewCtrl As MSForms.CommandButton)
colCtrl.Add NewCtrl
End Sub
'---( Rgst method )------------------------------------
Public Sub Rgst()
Dim i As Integer
If (blnRgst = True) Then
'Done
ElseIf (colCtrl.Count = 0) Then
blnRgst = False
Else
ReDim clsCtrlCh(1 To colCtrl.Count)
For i = 1 To colCtrl.Count
' Create Instance
Set clsCtrlCh(i) = New clsBpcaCmdCh
With clsCtrlCh(i)
.Item = colCtrl(i)
.Index = i
.Parent = Me
End With
Next i
blnRgst = True
End If
End Sub
'---( Clear method )-------------------------
Public Sub Clear()
Dim i As Integer
If (blnRgst = True) Then
For i = 1 To colCtrl.Count
clsCtrlCh(i).Clear
Next i
End If
Set colCtrl = Nothing
Erase clsCtrlCh
blnRgst = False
End Sub
'---( Count property--------------------------------------
Public Property Get Count() As Integer
Count = colCtrl.Count
End Property
'---( Item property )---------------------------------------
Public Property Get Item(ByVal Index As Integer) _
As MSForms.CommandButton
If (blnRgst = True) And _
(Index > 0) And (Index <= colCtrl.Count) Then
Set Item = colCtrl(Index)
Else
Set Item = Nothing
End If
End Property
'===========================================================
'===== Method to be called from clsBpcaCmdCh =========
'===========================================================
Friend Sub RaiseClick(ByVal Index As Integer)
RaiseEvent Click(Index)
End Sub
==== clsBpcaCmdCh module (2nd-step class module) ====
Private WithEvents MyCtrl As MSForms.CommandButton
Private MyIndex As Integer 'Index number of the control
Private MyParent As clsBpcaCmd 'Referrence to the parent class
Private blnParent As Boolean '[Parent] register flag
'---( Clear method )------------------------------------------
Public Sub Clear()
Set MyCtrl = Nothing
Set MyParent = Nothing
blnParent = False
MyIndex = 0
End Sub
'---( Item property )-----------------------------------------
Public Property Let Item(NewCtrl As MSForms.CommandButton)
Set MyCtrl = NewCtrl
End Property
'---( Index property )----------------------------------------
Public Property Let Index(NewIndex As Integer)
MyIndex = NewIndex
End Property
'---( Parent property )---------------------------------------
Public Property Let Parent(NewParent As clsBpcaCmd)
blnParent = True
Set MyParent = NewParent
End Property
'=============================================================
'===== Receive an event of registered control ================
'=============================================================
'Receive an event of the control and notify the parent-class.
Private Sub MyCtrl_Click()
If (blnParent = True) Then
MyParent.RaiseClick MyIndex
End If
End Sub
This clsBpcaCmd and clsBpcaCmdCh class is a general-purpose class about the
click event of the CommandButton.
(a) Not only Weekday-Button, you can use it for the array of other CommandButtons.
(b) On one UserFom, you can make the plural array of CommandButtons.
You should only prepare plural class object definitions as follows.
Private WithEvents CmdGrp1 As clsBpcaCmd
Private WithEvents CmdGrp2 As clsBpcaCmd
:
:
(c) The number of CommandButtons which a class object can store away does not have
the limit. The correction of the macro code of the class module cannot be necessary
about the thing. You only merely repeat "Add method".
With CmdGrp1
.Add CommandButton1
.Add CommandButton2
:
:
(d) About the CommandButton to create dynamically , you can handle a click event
with this class.
However, it is inconvenient to be usable only by the Click event of CommandButton.
Because there are other controls such as TextBox, too, and there are other events
such as Change, too; ...
Therefore, I prepared General-purpose class (clsBpca Ver 4.0) which supported
controls such as CommandButton,TextBox etc. and events such as Click,Change etc. .
In Ver2.0, a problem becomes available for Enter event etc. submitting in follows.
Please use it.
In fact, the following problem remains one more last.
In the class module of VBA,
we cannot define Enter, Exit, BeforeUpdate and AfterUpdate events.
These events are often used in error check and ActiveControl indication, etc.
I am disappointed at that I cannot use these events with Control-Array that
became available with much effort.
I explain why you cannot use the events of Enter etc. in a class module.
(a) In the case of UserForm module ....
For control placed in UserForm or control object (with WithEvents) defined
in MsForms.TextBox etc., we can generate various event procedure from the
list of Declarations of the module window top right corner. Naturally Enter
event etc. are included in that, too.
(b) In the case of Class module ....
For control object (with WithEvents) defined in MsForms.TextBox etc., Enter
event etc. are not included in the list of Declarations.
(c) In the first place, the definitions of Enter,Exit,BeforeUpdate,AfterUpdate are not
implemented in MsForms.TextBox etc. (You can confirm this by Object-Browser.)
(d) The definitions of Enter, Exit, BeforeUpdate, AfterUpdate are implemented by
MsForms.Control. (You can confirm this by Object-Browser, too.)
(e) In the UserForm module, VBA links MsForms.Control to MsForms.TextBox etc..
Because of support of VBA, we can build event procedures including Enter etc.
for control of MsForms.Text etc. in UserForm module.
(f) Class module does not have such a support.
Therefore we cannot build events of Enter etc. from control of MsForms.Text etc.
in class module.
In a class module, I will prepare an object (with WithEvents) defined in MsForms.Control.
Then I can generate a template of the event procedure of Enter from a list of Declalations.
Then, if you copy a control object from MsForms.TextBox to MsForms.Control, will
a problem be solved it?
Unfortunately then it is not solved.
MsForms.Control from MsForms.TextBox cannot copy it.
The following copy becomes the error.
Dim Ctrl1 As MsForms.TextBox
Dim Ctrl2 As MsForms.Control
Set Ctrl2 = Ctrl1 ' Error
For such a reason, Enter etc. are not available in the class module.
In addition, in General-purpose class (clsBpca Ver 2.0), a class module
is able to build events of Enter/Exit/BeforeUpdate/AfterUpdate by a
different method.
Please see below for the explanation of General-purpose class.
[ Link to here ]
General-purpose class module (clsBpca Ver 4.0)
and Usage example.
(Note)
Because Enter / Exit events implement it by Windows-API, you cannot use Ver4.0 in Mac PC.
In the case of Mac PC, please use Ver1.4 where Enter / Exit events are not implemented.
Event programming same as VisualBasic is enabled in VBA ,
only if you import clsBpca class module in your workbook as the Black-Box.
What you should do is ...
At first, prepare for a variable of Control-Array (clsBpca object).
Next, carry out "Rgst" method after repeating "Add" method.
After that ... , describe event procedure commonly.
Only this. ( Please check it in Sample Macro )
clsBpca supports the following controls and events, and it works in x64.
-- Controls --
Label , TextBox , CommandButton , OptionButton
CheckBox , ComboBox , SpinButton , ToggleButton
Among standard controls, ListBox/Frame/TabStrip/ MultiPage/ScrollBar is excluded
from supported controls. It is the reason that is not placed much so that these controls
becomes Control-Array.
-- Events --
Enter , Exit , BeforeUpdate , AfterUpdate
Change , Click , DblClick , KeyDown , KeyPress , KeyUp
MouseMove , MouseDown , MouseUp
SpinDown , SpinUp , DropButtonClick
FakeExit
FakeExit event was added in Ver3.0 ( 11 Oct. 2016 ).
(Note: Ver3.1 (updated by malfunction , 13 Oct. 2016 )
In the case of the focus movement to get away from Frame / MultiPage, Exit event of the source
control does not fire (it fire later). FakeExit event to become the substitute was added.
( See below for further details. )
The use of the Enter / Exit / BeforeUpdate / AfterUpdate event is possible
since clsBpca in Ver2.0 ( 11 Aug. 2014 ).
In the class module of VBA, it cannot usually receive events of Enter , Exit , BeforeUpdate
and AfterUpdate of the MsForms-Controls. It become able to receive the events by using API
(ConnectToConnectionPoint).
( See below for further details. )
Downloading and the help document of clsBpca are follows.
[ clsBpca : Download & Help document ] ( 1 Sep. 2020 Ver 4.0 release )
----- 5. Use Examples of clsBpca -----
5-1. Using Exit event, if it is not a numeric, warning indication (TextBox)
& Using Enter / Exit event, ActiveControl indication
5-2. Using Change event, highlight the color of the button (OptionButton)
5-3. Using Change event, if it is not a numeric, warning indication (TextBox)
5-4. Using KeyDown event, if it is not an alphanumeric character, warning indication (TextBox)
5-5. Using Click event, Calculator
5-6. Using MouseMove & Click event, Color palette form
5-7. Using MouseMove & Click event, Calendar form
5-8. Use example to the dynamic creation control
5-9. Use example to controls on a worksheet
[ Link to here ]
1. Using Exit event, if it is not a numeric, warning indication (TextBox)
& Using Enter / Exit event, ActiveControl indication
The use of the Enter / Exit event is possible since clsBpca (Ver2.0).
Enter / Exit event is defined by the name of OnEnter / OnExit in clsBpca.
(Note) Because Enter / Exit events implement it by Windows-API, you cannot use it in Mac PC.
About a method to implement Enter / Exit event in a class module.
Video capture
( Bpca_EnterExitEvent.mp4 570KB )
Private WithEvents NumBox As clsBpca
Private Sub UserForm_Initialize()
Set NumBox = New clsBpca ' Create Instance
With NumBox
.Add txtNum1
.Add txtNum2
.Add txtNum3
.Add txtNum4
.Rgst BPCA_EnterExit
End With
End Sub
Private Sub UserForm_Terminate()
NumBox.Clear
Set NumBox = Nothing
End Sub
Private Sub NumBox_OnEnter(ByVal Index As Integer)
NumBox.ItmTxt(Index).BackColor = &HFFFFE0 'LightCyan
End Sub
Private Sub NumBox_OnExit(ByVal Index As Integer, _
ByVal Cancel As MSForms.ReturnBoolean)
If (NumBox.ItmTxt(Index).Value = "") Then
'Empty is OK
ElseIf IsNumeric(NumBox.ItmTxt(Index).Value) Then
'Numeric is OK
Else
'Not Numeric is Error
NumBox.ItmTxt(Index).BackColor = &HCCCCFF 'Light Red
Beep
Cancel = True
Exit Sub
End If
NumBox.ItmTxt(Index).BackColor = vbWindowBackground
End Sub
[ Link to here ]
2. Using Change event, highlight the color of the button (OptionButton)
Private WithEvents OptBtn As clsBpca
Private Sub UserForm_Initialize()
Set OptBtn = New clsBpca ' Create Instance
With OptBtn
.Add OptionButton1
.Add OptionButton2
.Add OptionButton3
.Add OptionButton4
.Add OptionButton5
.Rgst BPCA_Change
End With
End Sub
Private Sub UserForm_Terminate()
OptBtn.Clear
Set OptBtn = Nothing
End Sub
Private Sub OptBtn_Change(ByVal Index As Integer)
With OptBtn.ItmOpt(Index)
If (.Value = True) Then
.BackColor = &HCCCCFF 'Light Red
Else
.BackColor = Me.BackColor
End If
End With
End Sub
Private Sub cmdOptReset_Click()
Dim i As Integer
For i = 1 To 5
With OptBtn.ItmOpt (i)
If (.Value = True) Then
'I leave the change of the color to
'the Change event mentioned above
.Value = False
End If
End With
Next i
End Sub
[ Link to here ]
3. Using Change event, if it is not a numeric, warning indication (TextBox)
Private WithEvents NumBox As clsBpca
Private Sub UserForm_Initialize()
Set NumBox = New clsBpca ' Create Instance
With NumBox
.Add txtNum1
.Add txtNum2
.Add txtNum3
.Rgst BPCA_Change
End With
End Sub
Private Sub UserForm_Terminate()
NumBox.Clear
Set NumBox = Nothing
End Sub
Private Sub NumBox_Change(ByVal Index As Integer)
With NumBox.ItmTxt(Index)
If IsNumeric(.Value) Then
.BackColor = vbWindowBackground
Else
.BackColor = &HCCCCFF 'Light Red
End If
End With
End Sub
[ Link to here ]
4. Using KeyDown event, if it is not an alphanumeric character, warning indication (TextBox)
Private WithEvents AlfaNumBox As clsBpca
Private Sub UserForm_Initialize()
Set AlfaNumBox = New clsBpca ' Create Instance
With AlfaNumBox
.Add txtAN1
.Add txtAN2
.Add txtAN3
.Rgst BPCA_KeyDown
End With
End Sub
Private Sub UserForm_Terminate()
AlfaNumBox.Clear
Set AlfaNumBox = Nothing
End Sub
Private Sub AlfaNumBox_KeyDown _
(ByVal Index As Integer, _
ByVal KeyCode As MSForms.ReturnInteger, _
ByVal Shift As Integer)
Dim i As Integer
Dim blnERR As Boolean
With AlfaNumBox.ItmTxt(Index)
Select Case KeyCode
Case vbKeyTab, vbKeyReturn, vbKeyUp, vbKeyDown
'Type an input end key
blnERR = False
For i = 1 To Len(.Value)
Select Case Mid(.Value, i, 1)
Case "0" To "9"
Case "A" To "Z"
Case "a" To "z"
Case Else
blnERR = True
End Select
Next i
If (blnERR = False) Then
.BackColor = vbWindowBackground
Else
.BackColor = &HCCCCFF 'Light Red
End If
Case Else
'Inputting now
End Select
End With
End Sub
[ Link to here ]
5. Using Click event, Calculator
Private WithEvents CalcNum As clsBpca
Private WithEvents CalcOpr As clsBpca
Private intOperate As Integer 'Operator of Calculator
Private Sub UserForm_Initialize()
Dim i As Integer
txtCalcResult.Value = ""
txtCalcBuff.Value = ""
intOperate = 0
Set CalcNum = New clsBpca 'Create Instance
With CalcNum
For i = 1 To 9
.Add Me.Controls("cmdCalc" & i)
Next i
.Add cmdCalc0 '[10]
.Add cmdCalcSign '[11]
.Add cmdCalcPoint '[12]
.Rgst BPCA_Click
End With
Set CalcOpr = New clsBpca 'Create Instance
With CalcOpr
.Add cmdCalcClear '[1]
.Add cmdCalcMulti '[2]
.Add cmdCalcDivide '[3]
.Add cmdCalcPlus '[4]
.Add cmdCalcMinus '[5]
.Add cmdCalcEQ '[6]
.Rgst BPCA_Click
End With
End Sub
Private Sub UserForm_Terminate()
CalcNum.Clear
CalcOpr.Clear
Set CalcNum = Nothing
Set CalcOpr = Nothing
End Sub
Private Sub CalcNum_Click(ByVal Index As Integer)
Dim strWK As String
If (intOperate = 6) And (Index <> 11) Then
strWK = ""
intOperate = 0
Else
strWK = txtCalcResult.Value
End If
Select Case Index
Case 1 To 9
Select Case strWK
Case "0"
strWK = Index 'Omit 0 of the top
Case "-0"
strWK = "-" & Index 'Omit 0 of the top
Case Else
strWK = strWK & Index
End Select
Case 10
Select Case strWK
Case "0", "-0", "-"
'Let it ride
Case Else
strWK = strWK & "0"
End Select
Case 11 'Sign (Plus <--> Minus)
If (Left(strWK, 1) = "-") Then
strWK = Mid(strWK, 2)
Else
strWK = "-" & strWK
End If
Case 12 'Decimal point
If (InStr(strWK, ".") = 0) Then
strWK = strWK & "."
End If
End Select
txtCalcResult.Value = strWK
End Sub
Private Sub CalcOpr_Click(ByVal Index As Integer)
Dim i As Integer
Select Case Index
'[AC: All Clear]
Case 1
txtCalcResult.Value = ""
txtCalcBuff.Value = ""
intOperate = 0
For i = 2 To 5
CalcOpr.ItmCmd(i).BackColor = vbButtonFace
Next i
'[*][/][+][-]
Case 2 To 5
If (intOperate >= 2) And (intOperate <= 5) Then
Call Calc_Sub
End If
intOperate = Index
txtCalcBuff.Value = txtCalcResult.Value
txtCalcResult.Value = ""
For i = 2 To 5
With CalcOpr.ItmCmd(i)
If (i = Index) Then
.BackColor = &HC0FFFF 'Light Yellow
Else
.BackColor = vbButtonFace
End If
End With
Next i
'[=]
Case 6
Call Calc_Sub
intOperate = 6
For i = 2 To 5
CalcOpr.ItmCmd(i).BackColor = vbButtonFace
Next i
End Select
End Sub
Private Sub Calc_Sub()
Dim dblNum1 As Double
Dim dblNum2 As Double
dblNum1 = Val(txtCalcBuff.Value)
dblNum2 = Val(txtCalcResult.Value)
Select Case intOperate
Case 2
txtCalcResult.Value = CStr(dblNum1 * dblNum2)
Case 3
If (dblNum2 <> 0) Then
txtCalcResult.Value = CStr(dblNum1 / dblNum2)
Else
txtCalcResult.Value = "0"
End If
Case 4
txtCalcResult.Value = CStr(dblNum1 + dblNum2)
Case 5
txtCalcResult.Value = CStr(dblNum1 - dblNum2)
End Select
txtCalcBuff.Value = ""
End Sub
[ Link to here ]
6. Using MouseMove & Click event, Color palette form ( Layout before Excel2003 )
' Placement of the color index (Layout before Excel2003)
' A control name (lblPalette99) is acquired so
' that it is placed follows.
'
' [01] [53] [52] [51] [49] [11] [55] [56]
' [09] [46] [12] [10] [14] [05] [47] [16]
' [03] [45] [43] [50] [42] [41] [13] [48]
' [07] [44] [06] [04] [08] [33] [54] [15]
' [38] [40] [36] [35] [34] [37] [39] [02]
' ---------------------------------------
' [17] [18] [19] [20] [21] [22] [23] [24]
' [25] [26] [27] [28] [29] [30] [31] [32]
Private WithEvents Palette As clsBpca
Private Sub UserForm_Initialize()
Dim i As Integer
lblPaletteRGB.Caption = ""
Set Palette = New clsBpca 'Create Instance
With Palette
For i = 1 To 56
.Add Me.Controls("lblPalette" & i)
Next i
.Add lblPaletteFrame '(57)
.Rgst BPCA_MouseMove + BPCA_Click
End With
For i = 1 To 56
With Palette.ItmLbl(i)
.BackColor = ThisWorkbook.Colors(i)
.ControlTipText = _
"(" & Format(i, "00") & ") x" & _
Right("000000" & Hex(ThisWorkbook.Colors(i)), 6)
End With
Next i
End Sub
Private Sub UserForm_Terminate()
Palette.Clear
Set Palette = Nothing
End Sub
Private Sub Palette_Click(ByVal Index As Integer)
If (Index <= 56) Then
lblPaletteRGB.BackColor = Palette.ItmLbl(Index).BackColor
End If
End Sub
Private Sub Palette_MouseMove _
(ByVal Index As Integer, _
ByVal Button As Integer, _
ByVal Shift As Integer, _
ByVal X As Single, ByVal Y As Single)
Dim i As Integer
Select Case Index
Case 1 To 56
'When mouse cursor overlaps with a palette,
'only the palette makes a convex.
For i = 1 To 56
With Palette.ItmLbl(i)
If (i = Index) Then
If (.SpecialEffect = fmSpecialEffectEtched) Then
.SpecialEffect = fmSpecialEffectRaised
End If
Else
If (.SpecialEffect = fmSpecialEffectRaised) Then
.SpecialEffect = fmSpecialEffectEtched
End If
End If
End With
Next i
Case Else
'If mouse cursor deviates from the palette,
'it goes all back up in a flat.
'[ lblPaletteFrame(57) ]
For i = 1 To 56
With Palette.ItmLbl(i)
If (.SpecialEffect = fmSpecialEffectRaised) Then
.SpecialEffect = fmSpecialEffectEtched
End If
End With
Next i
End Select
End Sub
[ Link to here ]
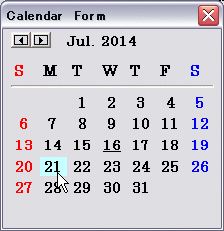
7. Using MouseMove & Click event, Calendar form
Video capture
( Bpca_CalendarForm.mp4 0.4MB )
Private WithEvents CalBtn As clsBpca
Private dtmBaseDate As Date
Private dtmFirstDate As Date
Private dtmLastDate As Date
Private Sub UserForm_Initialize()
Dim i As Integer
Set CalBtn = New clsBpca ' Create Instance
With CalBtn
For i = 1 To 37
.Add Me.Controls("lblDay" & i)
Next i
.Rgst BPCA_Click + BPCA_MouseMove
End With
dtmFirstDate = DateSerial(Year(Date), Month(Date), 1)
Call CalendarMake
End Sub
Private Sub UserForm_MouseMove( _
ByVal Button As Integer, ByVal Shift As Integer, _
ByVal X As Single, ByVal Y As Single)
'All highlights are turned off by handing Zero
Call CalMousePoint(0)
End Sub
Private Sub UserForm_Terminate()
CalBtn.Clear
Set CalBtn = Nothing
End Sub
Private Sub CalBtn_Click(ByVal Index As Integer)
MsgBox "Click Date = " & _
Format(dtmBaseDate + Index - 1, "d mmm. yyyy")
End Sub
Private Sub CalBtn_MouseMove( _
ByVal Index As Integer, _
ByVal Button As Integer, ByVal Shift As Integer, _
ByVal X As Single, ByVal Y As Single)
'Highlight the button of the mouse position
Call CalMousePoint(Index)
End Sub
Private Sub spnMonth_SpinDown()
dtmFirstDate = DateSerial(Year(dtmFirstDate), _
Month(dtmFirstDate) - 1, 1)
Call CalendarMake
End Sub
Private Sub spnMonth_SpinUp()
dtmFirstDate = DateSerial(Year(dtmFirstDate), _
Month(dtmFirstDate) + 1, 1)
Call CalendarMake
End Sub
Private Sub CalendarMake()
Dim dtmWK As Date
Dim i As Integer
dtmLastDate = DateSerial(Year(dtmFirstDate), _
Month(dtmFirstDate) + 1, 0)
dtmBaseDate = dtmFirstDate - Weekday(dtmFirstDate) + 1
lblMonth.Caption = Format(dtmFirstDate, "mmm. yyyy")
For i = 1 To 37
dtmWK = dtmBaseDate + i - 1
With CalBtn.ItmLbl(i)
If (dtmWK >= dtmFirstDate) And (dtmWK <= dtmLastDate) Then
.Caption = Day(dtmWK)
.Visible = True
If (dtmWK = Date) Then
.ControlTipText = "Today"
.Font.Underline = True
Else
.ControlTipText = ""
.Font.Underline = False
End If
Else
.Visible = False
End If
End With
Next i
End Sub
'---- Highlight the button of the mouse position ----
Private Sub CalMousePoint(ByVal Index As Integer)
Dim i As Integer
For i = 1 To 37
With CalBtn.ItmLbl(i)
If (i = Index) Then
If (.BackColor = Me.BackColor) Then
.BackColor = &HFFFFC0 'Thin light blue
End If
Else
If (.BackColor <> Me.BackColor) Then
.BackColor = Me.BackColor
End If
End If
End With
Next i
End Sub
You can make a general-purpose Calendar Tool
from the UserForm (frmCalendarTool) mentioned above.
Please perform import of the calendar form (frmCalendarTool) in your
workbook from [ Bpca_Class_V30E.zip > Export_V30E > frmCalendarTool.frm ].
When you clicked Day-button or Close-button, frmCalendarTool closes UserForm
in Hide unlike frmBpca3. In this way, the caller macro can receive a result (Serial
value or -1). (see below)
If you make the following CalendarForm function, you can perform the input of the
date with the popup calendar.
=== frmCalendarTool module ===
'Serial_Number(Date clicked) or [-1](Cancel)
Public ReturnValue As Date
Private WithEvents CalBtn As clsBpca
:
:
Private Sub UserForm_QueryClose _
(Cancel As Integer, CloseMode As Integer)
If (CloseMode = vbFormControlMenu) Then
Cancel = True
ReturnValue = -1 'Cancel
Me.Hide
End If
End Sub
Private Sub CalBtn_Click(ByVal Index As Integer)
ReturnValue = dtmBaseDate + Index - 1
Me.Hide
End Sub
=== Standard module ===
Public Function CalendarForm() As Date
frmCalendarTool.Show
CalendarForm = frmCalendarTool.ReturnValue
Unload frmCalendarTool
End Function
=== Any UserForm ===
Private Sub TextBox1_DblClick _
(ByVal Cancel As MSForms.ReturnBoolean)
Dim DateWk As Date
DateWk = CalendarForm
If (DateWk = -1) Then
'Cancel
Else
TextBox1.Value = Format(DateWk, "yyyy/m/d")
End If
Cancel = True
End Sub
Private Sub TextBox2_DblClick _
(ByVal Cancel As MSForms.ReturnBoolean)
Dim DateWk As Date
DateWk = CalendarForm
If (DateWk = -1) Then
'Cancel
Else
TextBox2.Value = Format(DateWk, "yyyy/m/d")
End If
Cancel = True
End Sub
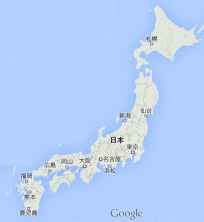
The macro of the calendar form becomes the Map selection form
if you change the placement of Label controls.
The figure below is Japanese map form (selection of the prefecture).
This sample is not included in the distribution file.
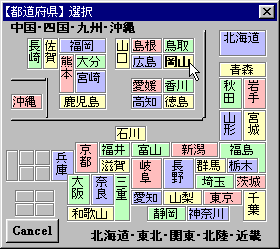
Video capture
( Bpca_JapanMapForm.mp4 0.9MB )
[ Link to here ]
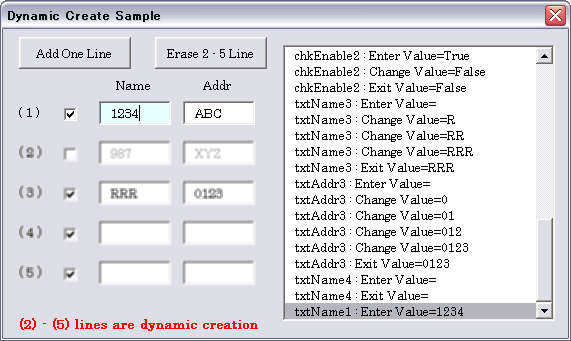
8. Use example to dynamic creation control ( 3 Nov. 2016 added )
It create 2-5 lines of control sets dynamically.
(the 1st line has been made at the time of a design)
You delete the added controls and can go back up in initial state.
[ Bpca_DynamicCreate_Eng.xls ]
'It store a Control-Name not an Object in colAddCtrl (in consideration of Remove).
Private colAddCtrl As Collection
Private WithEvents AddChkEnable As clsBpca
Private WithEvents AddTxtName As clsBpca
Private WithEvents AddTxtAddr As clsBpca
'---------------------------------------------------------
Private Sub Bpca_Clear()
AddChkEnable.Clear
AddTxtName.Clear
AddTxtAddr.Clear
Set AddChkEnable = Nothing
Set AddTxtName = Nothing
Set AddTxtAddr = Nothing
End Sub
'---------------------------------------------------------
Private Sub Bpca_Registration()
Dim vntArray As Variant
Dim j As Integer
Set AddChkEnable = New clsBpca
Set AddTxtName = New clsBpca
Set AddTxtAddr = New clsBpca
For j = 1 To colAddCtrl.Count
vntArray = colAddCtrl(j)
AddChkEnable.Add Me.Controls(vntArray(1)) 'chkEnable
AddTxtName.Add Me.Controls(vntArray(2)) 'txtName
AddTxtAddr.Add Me.Controls(vntArray(3)) 'txtAddr
Next j
AddChkEnable.Rgst BPCA_Change + BPCA_EnterExit
AddTxtName.Rgst BPCA_Change + BPCA_EnterExit
AddTxtAddr.Rgst BPCA_Change + BPCA_EnterExit
End Sub
'---------------------------------------------------------
Private Sub DisplayListBox(ByVal Arg As String)
With ListBox1
.AddItem Arg
.ListIndex = .ListCount - 1
End With
End Sub
'---------------------------------------------------------
Private Sub UserForm_Initialize()
'For 1st lines(lblNo1 & chkEnable1 & txtName1 & txtAddr1)
'which are prepared by a design.
Set colAddCtrl = New Collection
colAddCtrl.Add Array("lblNo1", "chkEnable1", "txtName1", "txtAddr1")
Call Bpca_Registration
txtName1.SetFocus
End Sub
'---------------------------------------------------------
Private Sub UserForm_Terminate()
Set colAddCtrl = Nothing
Call Bpca_Clear
End Sub
'---------------------------------------------------------
Private Sub cmdAddLine_Click()
Dim ctlLbl As MSForms.Label
Dim ctlChk As MSForms.CheckBox
Dim ctlTxtName As MSForms.TextBox
Dim ctlTxtAddr As MSForms.TextBox
Dim vntArray As Variant
Dim j As Integer
If (colAddCtrl.Count = 5) Then ' Max 5 line
Beep
Exit Sub
End If
j = colAddCtrl.Count + 1
Set ctlLbl = Me.Controls.Add("Forms.Label.1")
With ctlLbl
.Name = "lblNo" & j
.Top = 56 + 30 * (j - 1)
.Left = 12
.Height = 12
.Width = 24
.Caption = "( " & j & " )"
End With
Set ctlChk = Me.Controls.Add("Forms.CheckBox.1")
With ctlChk
.Name = "chkEnable" & j
.Top = 54 + 30 * (j - 1)
.Left = 45
.Height = 20
.Width = 20
.Caption = ""
.Value = True
End With
Set ctlTxtName = Me.Controls.Add("Forms.TextBox.1")
With ctlTxtName
.Name = "txtName" & j
.Top = 54 + 30 * (j - 1)
.Left = 72
.Height = 18
.Width = 54
.Enabled = True
.Value = ""
End With
Set ctlTxtAddr = Me.Controls.Add("Forms.TextBox.1")
With ctlTxtAddr
.Name = "txtAddr" & j
.Top = 54 + 30 * (j - 1)
.Left = 135
.Height = 18
.Width = 54
.Enabled = True
.Value = ""
End With
colAddCtrl.Add Array(ctlLbl.Name, ctlChk.Name, ctlTxtName.Name, ctlTxtAddr.Name)
'Reset for created controls (chkEnableX & txtNameX & txtAddrX)
Call Bpca_Clear
Call Bpca_Registration
ctlTxtName.SetFocus
End Sub
'---------------------------------------------------------
Private Sub cmdEraseLine_Click()
Dim vntArray As Variant
Dim j As Integer
If (colAddCtrl.Count = 1) Then
Beep
Exit Sub
End If
'In the case of deletion, please carry it out in order of
'[Bpca_Clear > Control-Remove > Bpca_Registration].
Call Bpca_Clear
For j = colAddCtrl.Count To 2 Step -1
vntArray = colAddCtrl(j)
Me.Controls.Remove vntArray(0) 'lblNo
Me.Controls.Remove vntArray(1) 'chkEnable
Me.Controls.Remove vntArray(2) 'txtName
Me.Controls.Remove vntArray(3) 'txtAddr
Next j
chkEnable1.Value = True
With txtName1
.Enabled = True
.Value = ""
End With
With txtAddr1
.Enabled = True
.Value = ""
End With
Set colAddCtrl = Nothing
Set colAddCtrl = New Collection
colAddCtrl.Add Array("lblNo1", "chkEnable1", "txtName1", "txtAddr1")
Call Bpca_Registration
Call DisplayListBox("---------- Erase (2)-(5) lines ----------")
txtName1.SetFocus
End Sub
'---------------------------------------------------------
Private Sub AddChkEnable_OnEnter(ByVal Index As Integer)
With AddChkEnable.Item(Index)
.BackColor = &HFFFFE0 'LightCyan
Call DisplayListBox(.Name & " : Enter Value=" & .Value)
End With
End Sub
Private Sub AddChkEnable_Change(ByVal Index As Integer)
With AddChkEnable.Item(Index)
Call DisplayListBox(.Name & " : Change Value=" & .Value)
End With
'The Index number of TextBox becomes same as CheckBox of the same line.
AddTxtName.Item(Index).Enabled = AddChkEnable.Item(Index).Value
AddTxtAddr.Item(Index).Enabled = AddChkEnable.Item(Index).Value
End Sub
Private Sub AddChkEnable_OnExit(ByVal Index As Integer, _
ByVal Cancel As MSForms.ReturnBoolean)
With AddChkEnable.Item(Index)
.BackColor = vbButtonFace
Call DisplayListBox(.Name & " : Exit Value=" & .Value)
End With
End Sub
'---------------------------------------------------------
Private Sub AddTxtName_OnEnter(ByVal Index As Integer)
With AddTxtName.Item(Index)
.BackColor = &HFFFFE0 'LightCyan
Call DisplayListBox(.Name & " : Enter Value=" & .Value)
End With
End Sub
Private Sub AddTxtName_Change(ByVal Index As Integer)
With AddTxtName.Item(Index)
Call DisplayListBox(.Name & " : Change Value=" & .Value)
End With
End Sub
Private Sub AddTxtName_OnExit(ByVal Index As Integer, _
ByVal Cancel As MSForms.ReturnBoolean)
With AddTxtName.Item(Index)
.BackColor = vbWindowBackground
Call DisplayListBox(.Name & " : Exit Value=" & .Value)
End With
End Sub
'---------------------------------------------------------
Private Sub AddTxtAddr_OnEnter(ByVal Index As Integer)
With AddTxtAddr.Item(Index)
.BackColor = &HFFFFE0 'LightCyan
Call DisplayListBox(.Name & " : Enter Value=" & .Value)
End With
End Sub
Private Sub AddTxtAddr_Change(ByVal Index As Integer)
With AddTxtAddr.Item(Index)
Call DisplayListBox(.Name & " : Change Value=" & .Value)
End With
End Sub
Private Sub AddTxtAddr_OnExit(ByVal Index As Integer, _
ByVal Cancel As MSForms.ReturnBoolean)
With AddTxtAddr.Item(Index)
.BackColor = vbWindowBackground
Call DisplayListBox(.Name & " : Exit Value=" & .Value)
End With
End Sub
[ Link to here ]
9. Use example to controls on a worksheet ( 1 Sep. 2020 added )
Video capture ( Bpca_SheetControlEvent_Eng.mp4 231KB )
'----- clsBpca : Example of using controls on a worksheet -----
Private WithEvents Bpca_ShCmd As clsBpca
'Use a label control (lblFrame) instead of a frame.
'The processing of lblFrame may be described in the Sheet1 module,
'but in order to complete it in Thisworkbook module,
'clsBpca is applied by lblFrame alone.
Private WithEvents Bpca_ShLbl As clsBpca
'-----------------------------------------------------------------
Private Sub Workbook_Open()
Set Bpca_ShCmd = New clsBpca ' Create instance
Set Bpca_ShLbl = New clsBpca
' [ <Worksheet name> .OLEObjects( <Control Name> ).Object ]
With Worksheets("Main")
Bpca_ShCmd.Add .OLEObjects("CommandButton5").Object
Bpca_ShCmd.Add .OLEObjects("CommandButton6").Object
Bpca_ShCmd.Add .OLEObjects("CommandButton7").Object
Bpca_ShCmd.Add .OLEObjects("CommandButton8").Object
Bpca_ShCmd.Rgst BPCA_Click + BPCA_MouseMove
Bpca_ShLbl.Add .OLEObjects("lblFrame").Object
Bpca_ShLbl.Rgst BPCA_MouseMove
End With
End Sub
'-----------------------------------------------------------------
Private Sub Workbook_BeforeClose(Cancel As Boolean)
'Be sure to write [On Error Resume Next] in case the object variables
'(Bpca_ShCmd, Bpca_ShLbl) have been initialized (resulting in a runtime error)
'due to a VBA project reset.
On Error Resume Next
Bpca_ShCmd.Clear
Bpca_ShLbl.Clear
Set Bpca_ShCmd = Nothing
Set Bpca_ShLbl = Nothing
End Sub
'-----------------------------------------------------------------
Private Sub Bpca_ShCmd_Click(ByVal Index As Integer)
MsgBox "[ clsBpca ] Example of using controls on a worksheet" & vbCrLf & vbCrLf & _
Bpca_ShCmd.ItmCmd(Index).Caption & " was pressed.", vbInformation
Bpca_ShCmd.ItmCmd(Index).BackColor = &H80FFFF 'Light Yellow
End Sub
'-----------------------------------------------------------------
Private Sub Bpca_ShCmd_MouseMove(ByVal Index As Integer, ByVal Button As Integer, _
ByVal Shift As Integer, ByVal X As Single, ByVal Y As Single)
Dim i As Integer
For i = 1 To Bpca_ShCmd.Count
With Bpca_ShCmd.ItmCmd(i)
If (i = Index) Then
If (.BackColor = &H80FFFF) Then
.BackColor = &HC0C0FF 'Light Red
End If
Else
If (.BackColor <> &H80FFFF) Then
.BackColor = &H80FFFF 'Light Yellow
End If
End If
End With
Next i
End Sub
'-----------------------------------------------------------------
'Use label control (lblFrame) instead of frame
'to detect mouse release from all command buttons.
Private Sub Bpca_ShLbl_MouseMove(ByVal Index As Integer, ByVal Button As Integer, _
ByVal Shift As Integer, ByVal X As Single, ByVal Y As Single)
Dim i As Integer
For i = 1 To Bpca_ShCmd.Count
With Bpca_ShCmd.ItmCmd(i)
If (.BackColor <> &H80FFFF) Then
.BackColor = &H80FFFF 'Light Yellow
End If
End With
Next i
End Sub